
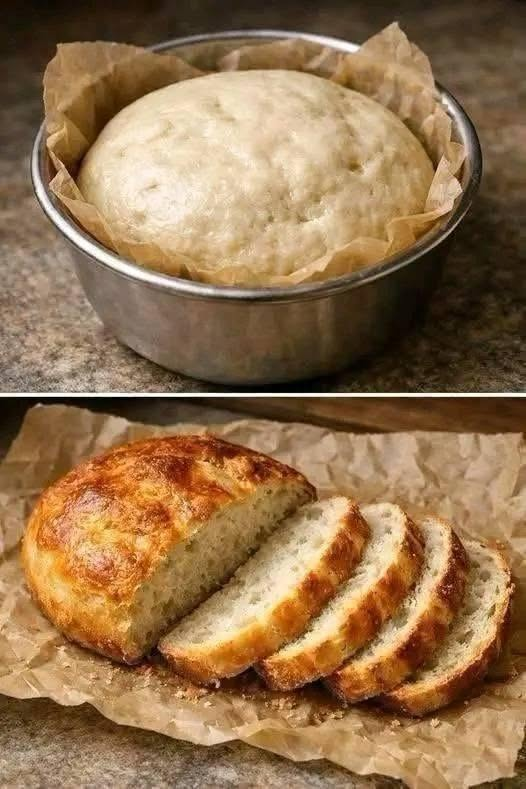
The aroma of freshly baked bread permeating the kitchen is very unique. It reminds me of leisurely mornings, warm cups of tea, family breakfasts, and those small occasions when everyone gets together at the table for no particular reason.
Even if you have never baked bread from home, Homemade No-Knead Bread is one of those easy recipes that will make you feel like a baker. You can bake a lovely golden loaf with a crisp top and a soft, tender within with a few common ingredients, minimal hands-on work, and a little perseverance.
Homemade No-Knead Bread (Easy Crusty Bread): Anti-Inflammatory Recipe
Recipe Description
Homemade No-Knead Bread is a simple, rustic bread with a golden-brown crust and a soft, fluffy interior. This easy crusty bread recipe requires minimal hands-on preparation and no traditional kneading, making it ideal for beginners and home bakers.
Made with basic pantry ingredients, this bread can be adapted to include whole-grain flour, olive oil, seeds, and herbs for a more nutrient-dense option. Whole-grain variations provide more dietary fiber, while herbs such as rosemary and oregano add flavor without requiring excess salt.
Although no bread is inherently anti-inflammatory, choosing whole grains, limiting excess sodium, and pairing bread with vegetables, legumes, and healthy fats can help support an overall balanced, Mediterranean-style eating pattern.
Recipe at a Glance
- Preparation time: 15 minutes
- Rising time: 2–3 hours, depending on room temperature
- Baking time: 35–45 minutes
- Total time: Approximately 3–4 hours
- Servings: 8 slices
- Difficulty: Easy
- Cooking method: Oven-baked
- Diet: Vegetarian; vegan if made without dairy or honey
- Best for: Breakfast, sandwiches, soups, and healthy snacks
Ingredients
For the Homemade No-Knead Bread
- 3 cups (375 g) all-purpose flour
- 1¼ cups (300 ml) lukewarm water
- 2 teaspoons instant yeast
- 1 teaspoon salt
- 1 teaspoon honey or sugar, optional
- 1 tablespoon extra-virgin olive oil, optional
Optional Anti-Inflammatory Additions
- ½ cup whole-wheat flour, replacing an equal amount of all-purpose flour
- 1 tablespoon ground flaxseed
- 1 tablespoon chia seeds
- 1 teaspoon dried rosemary or oregano
- 1 tablespoon pumpkin or sunflower seeds
These additions can increase fiber, healthy fats, and micronutrients. Start with small amounts of seeds and whole-wheat flour because they can change the dough’s moisture requirements and texture.
Instructions
Step 1: Prepare the Dough
In a large mixing bowl, combine the flour, instant yeast, and salt. Add the lukewarm water and optional honey and olive oil.
Mix with a wooden spoon until a sticky, shaggy dough forms. The dough should look moist and uneven rather than smooth. No kneading is necessary.
Step 2: Let the Dough Rise
Cover the bowl with a clean kitchen towel or reusable cover.
Leave the dough in a warm, draft-free place for approximately 1–2 hours, or until it has noticeably expanded and looks bubbly. Cooler kitchens may require additional rising time.
For more flavor, refrigerate the covered dough for 8–12 hours after mixing, then allow it to warm slightly before shaping.
Step 3: Prepare the Baking Bowl
Preheat the oven to 400°F (200°C).
Line an oven-safe metal baking bowl or round cake pan with parchment paper. Ensure the parchment is rated for the oven temperature you are using.
Avoid placing parchment paper in direct contact with heating elements or using it above its manufacturer’s temperature limit.
Step 4: Shape the Bread
Lightly flour your work surface and turn out the dough. Gently fold the edges toward the center to form a round loaf.
Transfer the dough into the parchment-lined bowl. Cover loosely and let it rise for another 20–30 minutes, until slightly puffy.
Step 5: Bake Until Golden
Bake for approximately 35–45 minutes, depending on the depth and size of the baking vessel.
The bread should develop a golden-brown crust and sound hollow when tapped on the bottom. For a more reliable check, the center should reach approximately 200–210°F (93–99°C).
If the top browns too quickly, loosely cover it with foil during the final portion of baking.
Step 6: Cool and Slice
Carefully remove the bread from the oven and lift it out using the parchment paper, taking care not to burn yourself.
Place it on a wire rack and let it cool for at least 30–45 minutes before slicing. Cooling helps the crumb set and prevents the bread from becoming gummy.
Serve warm or at room temperature.
Serving Suggestions
1. Anti-Inflammatory Breakfast
Toast a slice and top it with mashed avocado, extra-virgin olive oil, black pepper, and lemon juice. Add an egg or a side of beans for protein.
2. Healthy Lunch Sandwich
Use two slices of bread with grilled chicken, hummus, leafy greens, tomatoes, and cucumber for a satisfying homemade sandwich.
3. Mediterranean-Style Snack
Serve toasted bread with hummus, sliced vegetables, olives, and a small drizzle of olive oil.
4. Soup and Bread
Pair a slice with lentil soup, vegetable soup, or bean stew. This combination supplies fiber and protein from the accompanying foods.
5. Garlic and Herb Toast
Brush slices lightly with olive oil and add minced garlic and chopped parsley. Toast until crisp for a flavorful side dish.
6. Healthy Evening Snack
Serve a slice with natural peanut butter, almond butter, or mashed avocado. Choose unsweetened spreads when possible.
Recipe Variations
1. Whole-Wheat No-Knead Bread
Replace up to half the all-purpose flour with whole-wheat flour. Add a little extra water if needed.
Whole-wheat flour contains more fiber than refined flour and may help support digestive health and better overall dietary quality.
2. Olive Oil and Rosemary Bread
Add 1–2 tablespoons of extra-virgin olive oil and 1 teaspoon of dried rosemary to the dough. This variation offers a fragrant Mediterranean flavor.
3. Flaxseed and Chia Bread
Mix in 1–2 tablespoons of ground flaxseed or chia seeds. These seeds provide fiber and plant-based omega-3 fatty acids, although their presence does not make bread a treatment for inflammation.
4. Garlic and Herb Bread
Add garlic powder, dried oregano, thyme, or rosemary. These ingredients provide flavor without relying on large amounts of salt.
5. Seeded Rustic Bread
Sprinkle sesame, sunflower, or pumpkin seeds over the dough before baking. You can also mix a small quantity into the dough.
6. Overnight No-Knead Bread
After mixing the ingredients, cover the dough and refrigerate it overnight. The slower fermentation can develop a more complex flavor. Allow enough time for the dough to become puffy before baking.
7. Dairy-Free and Vegan Bread
The basic recipe is naturally dairy-free when made with water and plant-based ingredients. Use sugar or omit the optional honey if you want a fully vegan loaf.
8. Lower-Sodium Bread
Reduce the salt modestly if appropriate for your dietary needs. Salt affects both flavor and yeast activity, so avoid eliminating it without adjusting expectations for the finished bread.
Is Homemade No-Knead Bread Anti-Inflammatory?
Homemade bread can fit into an anti-inflammatory eating pattern, but its effects depend on the ingredients, portion size, and overall diet.
The standard recipe uses refined flour, which provides less fiber than whole-grain flour. For a more nutrient-dense option, substitute some or all of the flour with whole-wheat flour, provided you adjust the water and rising time as needed.
Consider these practical strategies:
- Choose whole grains more often to increase dietary fiber.
- Include seeds such as flaxseed, chia, and pumpkin seeds for additional nutrients.
- Use extra-virgin olive oil as an optional source of unsaturated fat.
- Flavor the bread with herbs and spices rather than excessive salt.
- Pair bread with vegetables, beans, lentils, nuts, and other minimally processed foods.
There is no guarantee that a particular loaf will reduce inflammation. People with celiac disease must avoid wheat, barley, and rye, and those with wheat allergies should follow appropriate medical guidance.
Nutrition Information
The following figures are estimates for one slice when the basic recipe makes eight servings. Actual values vary with flour brand, slice size, and optional ingredients.
- Calories: 190–220
- Carbohydrates: 38–42 g
- Protein: 5–7 g
- Total fat: 1–4 g
- Dietary fiber: 1–2 g
- Sugar: 0–2 g
- Sodium: 250–350 mg
Adding olive oil or seeds will increase the fat and calorie content. Using whole-wheat flour generally increases fiber.
For a more accurate nutrition calculation, weigh the ingredients and divide the total nutritional values by the number of slices produced.
Storage and Freezing Tips
At room temperature: Store cooled bread in a bread bag or airtight container for approximately 2–3 days. A paper bag helps preserve the crust but allows the bread to dry more quickly.
In the refrigerator: Refrigeration can make bread stale faster, so it is generally unnecessary unless the environment is very hot or humid.
In the freezer: Slice the cooled loaf, place the slices in a freezer-safe bag, and freeze for up to 2–3 months for best quality. Toast slices directly from frozen or thaw them at room temperature.
Discard bread if you see mold. Do not simply cut away a moldy section of a soft loaf.
Frequently Asked Questions
1. Why is this recipe called no-knead bread?
The dough is mixed until the ingredients come together, then left to rise. Time and fermentation help develop its structure without the need for traditional kneading.
2. Can I make no-knead bread without sugar?
Yes. The optional honey or sugar can be omitted. Yeast can ferment the naturally available carbohydrates in flour, although fermentation speed may vary.
3. Can I use whole-wheat flour?
Yes. Begin by replacing about half the all-purpose flour with whole-wheat flour. Whole-wheat dough often needs more water and may produce a denser loaf.
4. Why is my bread dense?
Common causes include inactive yeast, insufficient rising time, excessive flour, or cutting the bread before it has cooled. Make sure the yeast is fresh and the dough has visibly expanded before baking.
5. Why is my bread gummy inside?
The loaf may be underbaked, too wet, or sliced while still hot. Bake until the center is fully cooked and allow the bread to cool before cutting.
6. Can I prepare the dough the night before?
Yes. Refrigerating the covered dough overnight can develop flavor and make baking more convenient the next day.
7. Is sourdough bread better for inflammation?
Sourdough fermentation changes the bread’s flavor and may affect digestibility and certain nutritional properties. However, it is not automatically anti-inflammatory, and its effects depend on the ingredients and the individual.
8. Is homemade bread healthier than store-bought bread?
It can be, particularly when made with whole grains and modest amounts of salt and added sugar. However, some commercial whole-grain breads are equally nutritious or more nutritious than homemade white bread.
9. Is this bread suitable for weight management?
Yes, it can fit into a balanced eating plan. Portion size, total energy intake, fiber content, and the foods served with the bread all matter.
10. Can people with diabetes eat this bread?
People with diabetes may be able to include bread in their meal plan, but carbohydrate portions and individual blood-glucose responses are important. Whole-grain flour can provide more fiber, but it does not eliminate the bread’s carbohydrate content.
Final Thoughts
Homemade No-Knead Bread is an easy, versatile recipe for anyone who wants fresh bread without the effort of traditional kneading. Its crisp golden crust and soft interior make it suitable for breakfast, sandwiches, soups, and everyday meals.