If you love fresh homemade bread but want to skip the labor-intensive kneading process, this No-Knead Bread recipe is your answer. It’s simple, requires minimal hands-on time, and produces a crusty, airy loaf that rivals artisan bread from a bakery. All you need is a bit of patience as the dough rests overnight, allowing time to develop flavor and texture naturally.
Whether you’re new to bread-making or a seasoned baker looking for a low-effort option, this method guarantees delicious results without all the hard work!
Why You’ll Love This Recipe
- No kneading required: The dough comes together in minutes and rests overnight—no kneading or special equipment needed.
- Crispy crust and soft interior: This bread delivers a golden, crunchy crust with a tender, open-crumb structure inside.
- Minimal ingredients: You only need basic pantry staples to make this bread.
- Perfect for beginners: Even if you’ve never baked bread before, this foolproof method is easy to follow.
Ingredients for No-Knead Bread
- 3 cups all-purpose flour (or bread flour)
- 1 ¼ teaspoons salt
- ½ teaspoon active dry yeast
- 1 ½ cups warm water (about 110°F)
Step-by-Step Instructions
1. Mix the Dough
In a large mixing bowl, combine the flour, salt, and yeast. Slowly pour in the warm water while stirring with a wooden spoon or spatula until the ingredients are just combined. The dough will be sticky and shaggy, but that’s exactly what you want.
2. Let the Dough Rest
Cover the bowl with plastic wrap or a clean kitchen towel and let it rest at room temperature for 12-18 hours. The dough will rise slowly during this time, developing flavor and a light, airy texture. It should double in size and be dotted with bubbles when it’s ready.
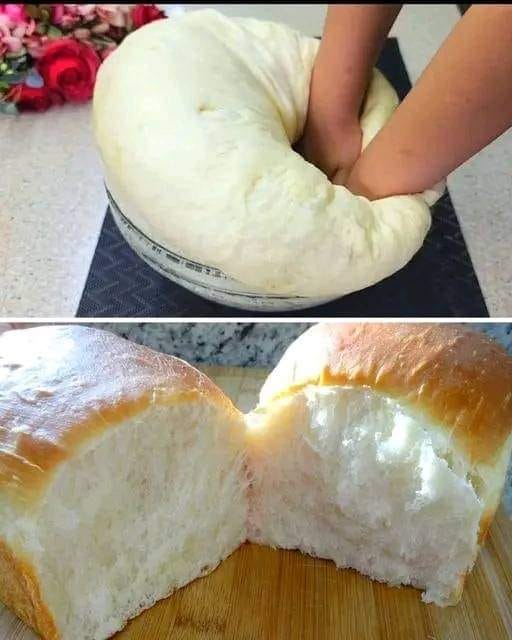
3. Shape the Dough
After the dough has rested, lightly flour your work surface and your hands. Turn the dough out onto the floured surface and gently shape it into a round ball. Try to handle the dough as little as possible to retain the air bubbles inside.
If you want a more structured loaf, you can fold the dough over itself a few times before shaping it. But remember, no kneading is necessary!
4. Second Rise
Line a clean kitchen towel with flour and place the dough seam-side down on the towel. Cover it with another towel and let it rise again for about 1-2 hours, or until it has puffed up slightly.
5. Preheat the Oven
About 30 minutes before the second rise is finished, preheat your oven to 450°F (230°C). Place a large Dutch oven or heavy oven-safe pot with a lid in the oven to heat up. The pot’s high temperature will help create a perfect, crusty exterior.
6. Bake the Bread
Once the dough is ready and the Dutch oven is hot, carefully remove the pot from the oven. Using the towel, gently transfer the dough into the Dutch oven (you can flip it seam-side up for a rustic look). Be cautious—both the dough and the pot will be very hot!
Cover the pot with the lid and bake for 30 minutes. Then, remove the lid and bake for an additional 15-20 minutes, until the bread is golden brown and sounds hollow when tapped on the bottom.
7. Cool and Enjoy
Carefully remove the bread from the Dutch oven and place it on a wire rack to cool for at least 30 minutes before slicing. This allows the bread’s interior to set and ensures the best texture.
Serving Suggestions
This No-Knead Bread is incredibly versatile and pairs beautifully with:
- Butter and jam: A classic breakfast option.
- Soups and stews: Perfect for soaking up brothy goodness.
- Cheese platters: Slice it up and serve alongside your favorite cheeses, cured meats, and olives.
- Sandwiches: Its sturdy structure makes it great for holding any sandwich fillings.
Tips for Perfect No-Knead Bread
- Use a Dutch oven or oven-safe pot: The key to achieving that crispy, bakery-style crust is baking the bread in a covered pot. The lid traps steam, creating the ideal baking environment.
- Don’t rush the rest time: Letting the dough rise slowly for 12-18 hours is crucial for developing flavor and texture.
- Experiment with flours: You can substitute a portion of the all-purpose flour with whole wheat or rye flour for a heartier loaf.
- Add-ins for variety: Mix in extras like dried herbs, seeds, olives, or roasted garlic to customize your bread.
Final Thoughts
This No-Knead Bread is proof that you don’t need to be an expert baker—or spend hours kneading dough—to create a beautiful, crusty loaf. With just a little planning and minimal effort, you’ll have a fresh, homemade bread that’s perfect for any occasion. Whether you’re enjoying it fresh from the oven with butter or using it for sandwiches, this bread will quickly become a staple in your kitchen.