Introduction
Imagine you’re craving a rich, chocolatey dessert, but the oven is off-limits, and you don’t have any flour. What do you do? You make this no-bake, no-flour dessert that comes together in just 10 minutes and satisfies every bit of your sweet tooth.
This dessert is ideal for:
-
Dorm rooms or hostel kitchens.
-
Hot summer days when you don’t want to bake.
-
A quick weeknight treat.
-
A last-minute dessert for unexpected guests.
What’s amazing about this recipe is that it uses simple pantry staples, can be customized endlessly, and tastes like something that took way longer to make.
🍽️ What Is This Dessert?
This recipe is essentially a no-bake chocolate fudge cake — but without the cake! It’s a silky, rich, chilled treat that can be sliced, scooped, or eaten with a spoon. Think of it as a cross between a chocolate truffle and a creamy pudding, firm enough to hold its shape but soft enough to melt in your mouth.
It’s a lifesaver for anyone who:
-
Has dietary restrictions (no flour, egg optional).
-
Doesn’t want to fuss with baking.
-
Loves chocolate (who doesn’t?).
🧾 Ingredients (Serves 6–8)
Here’s what you’ll need:
Main Ingredients:
-
1 ½ cups crushed biscuits (e.g., graham crackers, digestive, Marie, or tea biscuits)
-
½ cup sweetened condensed milk
-
3 tablespoons unsweetened cocoa powder
-
½ cup dark or semi-sweet chocolate chips
-
2 tablespoons butter (unsalted)
-
1 tablespoon milk (optional, to loosen if needed)
-
½ teaspoon vanilla extract
Optional Add-ins:
-
¼ cup chopped nuts (almonds, walnuts, pistachios)
-
¼ cup desiccated coconut
-
A pinch of salt (to balance the sweetness)
-
Chopped dates or raisins (for texture)
Toppings (Optional but Recommended):
-
Shaved chocolate
-
Crushed nuts
-
Coconut flakes
-
Whipped cream
-
Berries or banana slices
🍳 Equipment Needed
-
Mixing bowl
-
Saucepan or microwave-safe bowl
-
Spatula or spoon
-
A small square or loaf pan for shaping (or bowls for individual servings)
-
Parchment paper or cling film (for easy removal)
👩🍳 Instructions – Step-by-Step (Just 10 Minutes)
STEP 1: Prepare the Base
Start by crushing your biscuits. You can do this by placing them in a ziplock bag and rolling a rolling pin over them or pulsing them briefly in a food processor. You want a mix of fine crumbs and small chunks for texture.
Transfer to a large mixing bowl.
STEP 2: Melt the Chocolate Mixture
In a saucepan over low heat (or in the microwave in 20-second bursts), melt together:
-
Chocolate chips
-
Butter
-
Cocoa powder
-
Sweetened condensed milk
Stir constantly to avoid burning, and keep the heat low. This will become a rich, velvety mixture.
Once smooth, turn off the heat and stir in the vanilla extract and optional pinch of salt.
✅ TIP: If the mixture is too thick, add a tablespoon of milk to loosen it slightly.
STEP 3: Combine and Mix
Pour the warm chocolate mixture over the crushed biscuits. Mix well until everything is coated. If you’re adding nuts, coconut, or dried fruits, do it now.
The texture should be sticky and moldable — not runny.
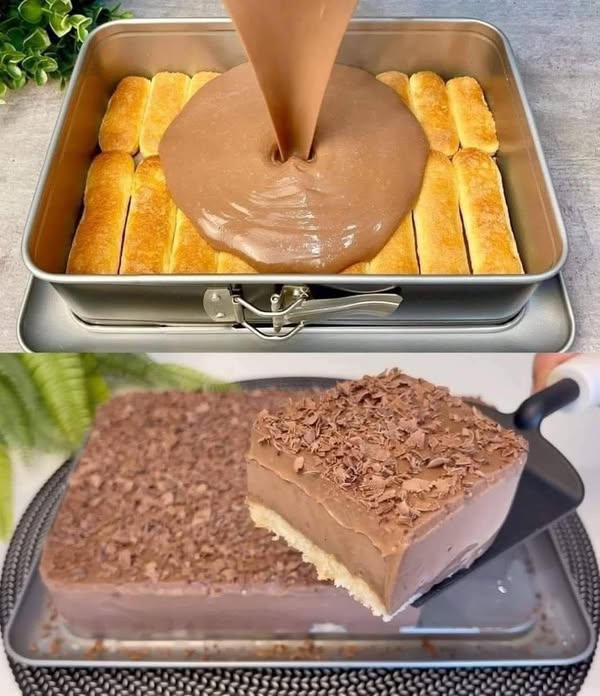
STEP 4: Shape the Dessert
Line a small loaf pan or any container with parchment or cling film.
Spoon the mixture into the container and press it down firmly using the back of a spoon or clean hands.
Smooth out the top.
💡 You can also press this into muffin cups to make individual portions.
STEP 5: Chill
Refrigerate for 1 hour if you can wait — but it’s ready to eat after just 10 minutes of chilling in the freezer.
This helps it firm up, but even at room temperature, the dessert is gooey and indulgent.
STEP 6: Serve and Enjoy!
Cut into squares, scoop with a spoon, or pop out your individual servings. Top with whipped cream, berries, nuts, or a drizzle of chocolate syrup.
💡 Variations & Creative Twists
Here’s where the fun begins — personalize your dessert in dozens of ways:
1. Peanut Butter Chocolate:
Add 2 tablespoons of peanut butter to the melted chocolate mixture for a Reese’s-style flavor.
2. Mocha Magic:
Add a teaspoon of instant coffee or espresso powder to enhance the cocoa flavor.
3. Mint Choco Delight:
Add a few drops of peppermint extract and top with crushed mint candies.
4. Fruit and Nut Mix:
Add chopped dried apricots, raisins, or dates and some toasted almonds or pistachios.
5. Layered Pudding Cups:
Alternate layers of the chocolate biscuit mix with whipped cream or yogurt in cups for a parfait-style dessert.
✅ Why This Recipe Works
-
No oven required — perfect for summer or limited kitchen access.
-
No flour — gluten-free friendly if you use GF biscuits.
-
Quick and easy — 10 minutes start to finish (plus chill time).
-
Customizable — from flavors to textures to toppings.
-
Comforting and indulgent — chocolatey, creamy, crunchy… all in one bite.
🔄 Storage Tips
-
Refrigerator: Keeps well for 4–5 days in an airtight container.
-
Freezer: Freeze for up to 1 month. Let it thaw 10 minutes before serving.
🔒 Pro Tip: Cut into squares before freezing for easy grab-and-go snacks.
🧠 Common Questions
Q: Can I make it vegan?
Yes! Use dairy-free chocolate, vegan biscuits, and plant-based condensed milk or coconut cream with sugar.
Q: Can I skip the butter?
Yes. Use a little more condensed milk or a spoon of coconut oil as a substitute.
Q: Can I make it sugar-free?
Use sugar-free biscuits, stevia-sweetened chocolate, and a light hand with condensed milk. Add Greek yogurt if desired for creaminess.
🍴 Best Occasions to Serve This Dessert
-
After-school snack
-
Festive gatherings (served in mini cups)
-
Quick party treat
-
Summer cookout dessert
-
Midnight craving fix
-
Dorm room comfort food
❤️ Final Thoughts
This no-oven, no-flour dessert is more than just a quick fix. It’s a creamy, chocolatey crowd-pleaser with endless variations to suit your taste buds. Whether you’re a beginner in the kitchen or just need something sweet fast, this recipe proves that you don’t need fancy equipment, flour, or even an oven to make something incredibly delicious.
With just 10 minutes and a few ingredients, you’ll be indulging in something that feels like a cheat meal but is secretly clever, adaptable, and just the beginning of your no-bake dessert adventures.