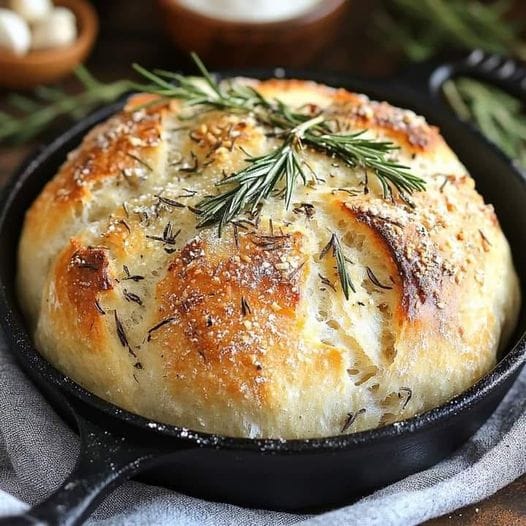
make rosemary & roasted garlic artisan bread in 6 steps
Roast the garlic and let it cool.
Mix the dough.
Cover and let it rise until it has doubled in size.
Shape your dough and dust with flour.
Cover and proof the dough in the fridge for 1 hour or as long as 24 hours.
Turn dough out onto parchment, score and bake.
Rosemary and Roasted Garlic Artisan Bread
Baking schedule
Making this rosemary & roasted garlic artisan bread is a two-day process where the bread is mixed and prepared on day one, cold proofed in the fridge overnight, then baked on day two.
Crusty, chewy, herby and wonderfully fragrant, this simple no-knead Rosemary & Roasted Garlic Artisan Bread is everything a good savoury loaf should be!
NOTE: This recipe has been updated to include an additional step in which the dough is cold proofed in the refrigerator prior to baking.
Total Time:18hours hrs 40minutes mins
Keyword: artisan bread, baking, bread, no-knead, roasted garlic, rosemary Servings: 1 loaf
Equipment
Digital scale
Spatula
Dough scraper
4 Qt mixing bowl
Parchment paper
3 Qt Dutch oven
Ingredients
Roasted Garlic
- 1 head garlic
- Extra-virgin olive oil
- Coarse sea salt and freshly ground black pepper
Bread
- 1½ cups water, room temperature (at or near 70°F/21°C)
- 1 teaspoon active dry yeast
- 3 cups bread or all-purpose flour, plus more for dusting
- ½ teaspoon dried oregano
- 1 teaspoon kosher or fine sea salt
- 2 teaspoons finely chopped rosemary plus more to sprinkle across the top
- 1 whole head roasted garlic smashed
- 1 tablespoon extra-virgin olive oil
- US Customary – Metric
Instructions
- Slice the garlic head in half. Drizzle the exposed cloves with olive oil and season with salt and pepper. Wrap in foil and roast on a baking sheet at 400ºF (204ºC) for 40 minutes. Let cool, remove cloves from their skins and set aside.
- When you’re ready to bake, sprinkle the yeast over the water and let it sit for 10-15 minutes. In a large bowl, stir together flour, oregano, salt and rosemary and set aside.
- Add yeast mixture, roasted garlic and olive oil to the bowl then use a rubber spatula to mix it together just until combined. The dough will look a little sticky and stringy and there should still be a little flour around the edges of the bowl.
- Cover and let rise somewhere warm (see note below) until it has doubled in size, about 8-10 hours.
- Once the dough has doubled in volume, use your hands (or a dough scraper if you have one) to pull the dough out onto a floured surface. With floured hands, gently fold the dough into itself several times until a soft, flour-covered ball is formed. Seam side up, lift and place it into a flour dusted proofing bowl like this one. Dust with flour, cover and refrigerate for a minimum of 1 hour or as long as 24 hours. You can even leave it for as long as 48 hours at this point if you’re not able to bake it right away.
- When you’re ready to bake your bread, preheat oven to 450ºF (232ºC) with a
- Dutch oven or covered baking vessel inside the oven.
- Uncover then invert the bowl to turn the dough out onto parchment paper seam side down. If needed, gently turn it with your hands and nudge it into the shape of a loaf. Score the top with a razor blade or the tip of a sharp knife with a design of your choosing. This will allow steam to escape while it’s baking.
- Once the oven is preheated, remove the Dutch oven from the oven and transfer the dough, still on the parchment, into the Dutch oven. Cover and bake for 30 minutes, then remove the cover and bake for 15-20 minutes more. Your bread will be done once the top is browned, and it sounds hollow when you tap the top.
- Using parchment edges, lift bread from Dutch oven and transfer it to a wire cooling rack to let cool for up to an hour before slicing.
Notes
Roasted garlic: You can use as much or as little roasted garlic as you like. Should you choose to add ½ the garlic, wrap the rest in foil or place it in an airtight container and keep it in the fridge to use later.
Rise time and temperature: An ambient rise temperature somewhere between ~70º-75º/20º-23ºC is ideal but even high 60’s/18º-19ºC should work if the dough is kept away from drafts. Note that rise times can vary based on temperature, environment and ingredients used. You will know your loaf is ready to bake when it has doubled in size, and this can take a minimum of 2-3 hours or as long as a full day. With a little experimentation, you will find the time frame that works best for you.
Storage: This bread will store well on the counter for 2-3 days and in the refrigerator for up to a week. Sliced bread will freeze well for up to 3 months.


