
Description
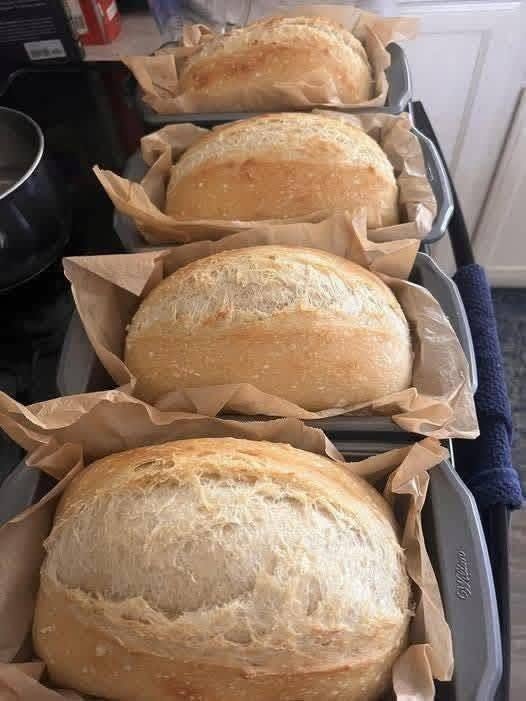
There is truly nothing quite like the aroma of freshly baked bread filling the kitchen—and these Artisan Country White Bread Loaves deliver bakery-level results straight from your own oven. Baked right in standard loaf pans lined with parchment paper, these loaves achieve the ultimate paradox of breadmaking: a thick, blistered, golden-brown crackly crust on the outside paired with a pillowy-soft, tender, and airy crumb on the inside. Whether you slice it thick for morning butter and jam, turn it into the ultimate grilled cheese, or use it for hearty deli sandwiches, this versatile recipe makes it easy to master rustic bread baking in batches.
Recipe Details
-
Prep time: 20 minutes (plus rise time)
-
Cook time: 35–40 minutes
-
Total time: 3 hours (including rising and resting)
-
Yields: 4 generous loaves
Ingredients
-
6 cups (750g) unbleached bread flour (or high-protein all-purpose flour)
-
2 ¼ cups (540ml) lukewarm water (about 105°F to 110°F)
-
1 packet (2 ¼ tsp) active dry yeast or instant yeast
-
2 tbsp honey or granulated sugar (to feed the yeast and aid browning)
-
2 ½ tsp fine sea salt or kosher salt
-
2 tbsp olive oil or melted unsalted butter (plus extra for brushing)
-
Optional for steam/crust: Ice cubes or a shallow pan of hot water in the oven
Step-by-Step Instructions
-
Activate the Yeast:
-
In a large mixing bowl, combine the lukewarm water, honey (or sugar), and yeast. Let it sit for 5 to 8 minutes until a light, foamy layer forms on top.
-
-
Mix and Knead the Dough:
-
Add the bread flour and sea salt to the yeast mixture. Stir with a wooden spoon or use a stand mixer fitted with a dough hook until a shaggy, cohesive dough forms.
-
Knead the dough for 8 to 10 minutes (by hand on a lightly floured surface or in a mixer) until it becomes smooth, elastic, and slightly tacky to the touch.
-
Shape the dough into a ball, place it in a lightly oiled bowl, cover it with a damp towel or plastic wrap, and let it rise in a warm spot for 1.5 to 2 hours, or until doubled in size.
-
-
Shape into Loaves:
-
Punch down the risen dough and divide it evenly into 4 portions.
-
Gently shape each portion into an oval batard or log that fits comfortably into your metal loaf pans.
-
Line each loaf pan with parchment paper (leaving an overhang for easy lifting) and place the shaped dough inside.
-
-
Second Rise:
-
Cover the pans loosely and let the loaves undergo a second rise for 45 to 60 minutes, until puffy and well-expanded.
-
-
Score and Bake:
-
Preheat your oven to 425°F (220°C).
-
Using a sharp razor or lame, make a single bold slash down the center or a few diagonal slashes across the top of each loaf.
-
Bake for 35 to 40 minutes, or until the crust is deep golden-brown and sounds hollow when tapped on the bottom. (Tip: Placing a small oven-safe pan with a few ice cubes at the bottom of the oven during the first 10 minutes creates steam, which gives you that classic blistered artisan crust.)
-
-
Cool Completely:
-
Carefully lift the loaves out of the pans using the parchment paper and transfer them to a wire rack. Let them cool completely for at least 1 hour before slicing—cutting into hot bread can make the interior gummy!
-
Pro Tips for Success
-
Weigh your flour: Using a kitchen scale to measure flour in grams ensures your hydration ratio stays consistent, preventing dense or overly sticky dough.
-
Don’t rush the cool-down: As tempting as it is to slice into warm bread immediately, letting the crumb set while cooling prevents it from compressing or turning gummy.
-
Freezing extras: Since this recipe yields 4 loaves, you can easily wrap completely cooled extra loaves tightly in plastic wrap and aluminum foil, then freeze them for up to 2 months. Thaw at room temperature and refresh in a 350°F oven for 5 minutes.
Frequently Asked Questions (Related High-Intent Questions)
-
Can I make this recipe using a sourdough starter instead of commercial yeast? Yes! You can substitute active fed sourdough starter for the yeast. Use about 1 cup (200g) of active starter and adjust the water and flour quantities slightly to maintain a similar dough consistency, extending the rise time since wild yeast works more slowly.
-
Why did my bread turn out dense instead of airy? Dense bread is usually the result of over-incorporating too much flour during the kneading process, under-proofing during the first or second rise, or cutting into the loaf before it has finished cooling and setting on the interior.
-
How do I store homemade artisan bread to keep the crust crisp? Unlike soft sandwich bread stored in plastic bags (which softens the crust), store artisan crusty bread cut-side down on a wooden cutting board covered with a clean kitchen towel, or in a paper bag for up to 2–3 days.