The aroma of freshly baked bread has a way of making a house feel cosier and more like home. It wasn’t a complex recipe or unique ingredients that made me truly appreciate the enchantment of homemade artisan bread for the first time. It was the idea of taking a gorgeous, golden loaf out of the oven and serving it to my loved ones.
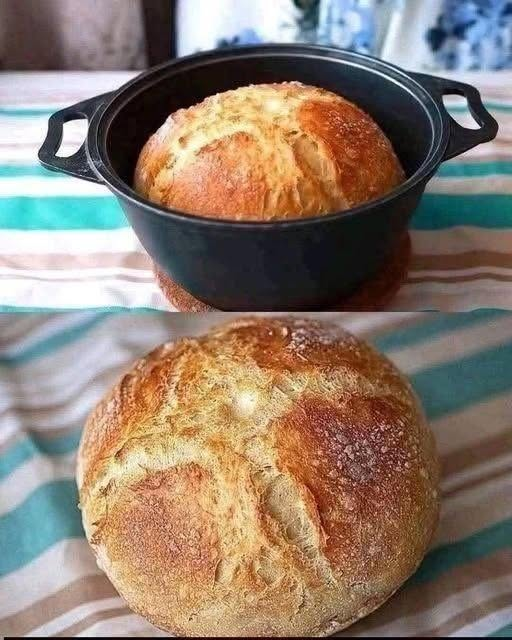
This Dutch Oven Crusty Artisan Bread is unique because of this. It features a soft, chewy middle, a lovely, crunchy crust, and a rustic appearance that suggests.
Dutch Oven Crusty Artisan Bread Recipe (Easy No-Knead Bread)
Recipe Description
Dutch Oven Crusty Artisan Bread is a rustic, bakery-style homemade bread featuring a golden, crunchy crust and a soft, airy interior. Baked in a preheated Dutch oven, this bread develops a beautiful crust and delicious texture without requiring professional baking equipment or extensive kneading.
This easy no-knead bread recipe uses simple pantry ingredients, including flour, water, yeast, and salt. The dough rests for several hours, allowing fermentation to develop its flavor and texture. Baking in a covered Dutch oven traps steam, helping the loaf rise and creating a crisp, artisan-style crust.
If you are looking for an easy homemade bread recipe, a beginner-friendly artisan loaf, or a versatile bread to serve with healthy meals, this recipe is an excellent choice.
Recipe at a Glance
- Preparation time: 15 minutes
- Rising time: 8–18 hours
- Cooking time: 40–50 minutes
- Total time: Approximately 9–19 hours
- Servings: 8–10 slices
- Cuisine: Rustic European-inspired
- Course: Breakfast, lunch, dinner, or snack
- Cooking method: Dutch oven baking
- Difficulty: Easy
- Dietary information: Vegetarian, dairy-free, and vegan when made with the ingredients listed
Ingredients
For the Artisan Bread
- 3 cups (375 g) all-purpose flour or bread flour
- 1½ cups (355 ml) lukewarm water
- ¼ teaspoon instant yeast
- 1½ teaspoons salt
- 1 teaspoon olive oil, optional, for lightly coating the bowl
Optional ingredients for additional flavor:
- 1 teaspoon dried rosemary
- 1 teaspoon dried thyme
- 1 tablespoon mixed seeds
- 1 teaspoon garlic powder
Equipment Needed
- A 4–6-quart Dutch oven with a heat-safe lid
- A large mixing bowl
- A wooden spoon or sturdy spatula
- Measuring cups or a kitchen scale
- Parchment paper suitable for high-temperature baking
- A clean kitchen towel
- A cooling rack
Always confirm that your Dutch oven, lid, and handles are rated for the temperature you plan to use.
Step-by-Step Instructions
Step 1: Mix the Dough
In a large mixing bowl, combine the flour, instant yeast, and salt. Stir to distribute the ingredients evenly.
Pour in the lukewarm water and mix with a wooden spoon until a rough, sticky dough forms. There is no need to knead the dough.
The dough should look shaggy and slightly sticky rather than smooth. If it appears unusually dry, add a small amount of water.
Step 2: Let the Dough Rise
Cover the bowl with a lid, plastic wrap, or a clean kitchen towel.
Leave the dough at room temperature for approximately 8–18 hours, depending on the room temperature and yeast activity.
The dough should become bubbly, expand noticeably, and develop a slightly domed or uneven surface. A cooler room may require a longer rise, while a warmer room may shorten it.
Step 3: Shape the Dough
Lightly flour a clean work surface. Gently turn the dough out onto the surface.
With floured hands or a dough scraper, fold the edges toward the center to form a rough ball.
Turn the dough seam-side down and gently shape it into a round loaf. Avoid aggressively pressing out the air bubbles.
Cover and let it rest for 30–45 minutes while the oven heats.
Step 4: Preheat the Dutch Oven
Place the empty Dutch oven and its oven-safe lid inside your oven.
Preheat to 450°F (232°C) for approximately 30 minutes.
Use oven mitts when handling the hot cookware. Never place a cold Dutch oven directly onto intense heat unless the manufacturer specifically permits it.
Step 5: Transfer the Dough
Carefully remove the hot Dutch oven from the oven and place it on a heat-resistant surface.
Transfer the dough into the pot using parchment paper, if suitable for the baking temperature. Keep your hands away from the hot sides.
For a more controlled expansion, make one shallow slash across the top of the dough with a sharp bread lame or knife before baking.
Step 6: Bake Covered
Cover the Dutch oven with its lid and bake for 30 minutes at 450°F (232°C).
The trapped steam helps the loaf expand and supports the formation of a crisp crust.
Step 7: Bake Uncovered
Carefully remove the lid and continue baking for another 10–20 minutes, or until the loaf is deeply golden brown.
The bread should sound hollow when tapped on the bottom. If using a food thermometer, the center of a lean loaf is generally around 200–210°F (93–99°C) when fully baked.
Step 8: Cool Before Slicing
Transfer the bread to a cooling rack and allow it to cool for at least 45–60 minutes.
Cooling helps the interior finish setting. Cutting too early can result in a gummy or compressed crumb.
Slice with a serrated bread knife and enjoy.
Tips for the Best Dutch Oven Crusty Artisan Bread
- Measure flour accurately. Weighing flour is more reliable than measuring by volume.
- Do not add too much flour. A sticky dough helps produce a moist, airy interior.
- Allow enough rising time. The dough should show clear signs of fermentation before shaping.
- Preheat the Dutch oven thoroughly. A hot baking vessel helps create strong oven spring.
- Keep the lid on initially. The covered stage traps steam and encourages expansion.
- Finish uncovered. This allows moisture to escape and the crust to brown.
- Let the bread cool completely. This improves its texture and makes slicing easier.
- Store it correctly. Keep the cooled loaf in a bread bag or paper bag at room temperature for the best crust texture.
Anti-Inflammatory Eating: Is Artisan Bread a Healthy Choice?
This Dutch Oven Crusty Artisan Bread recipe can fit into a balanced eating pattern, but it is important to understand what the term anti-inflammatory means.
No bread recipe has been proven to treat or prevent chronic inflammation on its own. A balanced dietary pattern that includes vegetables, fruits, legumes, nuts, seeds, whole grains, and healthy fats is generally a more meaningful approach to supporting overall health.
The basic recipe uses flour, water, yeast, and salt. It contains no added sugar or butter, making it a simple alternative to many enriched commercial breads.
How to Make This Bread More Nutritious
- Choose whole-wheat flour: Replace some or all of the white flour with whole-wheat flour for more fiber. Add water gradually because whole-wheat flour absorbs more liquid.
- Add seeds: Incorporate ground flaxseed, chia seeds, pumpkin seeds, or sunflower seeds for additional fiber and unsaturated fats.
- Include herbs: Rosemary, thyme, and oregano add flavor without requiring much additional salt.
- Serve with olive oil: Use a modest amount of extra-virgin olive oil as a dip alongside vegetables or a balanced meal.
- Pair with plant foods: Serve slices with lentil soup, bean dishes, leafy greens, or roasted vegetables.
People with celiac disease or wheat allergies should avoid this wheat-based recipe. Anyone managing blood sugar levels may wish to consider portion size, total carbohydrate intake, and the type of flour used.
Serving Suggestions
1. Healthy Breakfast
Serve a slice of warm artisan bread with scrambled eggs, avocado, tomatoes, or unsweetened nut butter.
2. Mediterranean-Style Lunch
Pair the bread with a chickpea salad, cucumber, tomatoes, olives, and a lemon-and-olive-oil dressing.
3. Soup and Bread Dinner
Serve alongside lentil soup, vegetable soup, minestrone, or homemade chicken soup.
4. Homemade Sandwiches
Use thick slices for grilled vegetable sandwiches, chicken sandwiches, egg sandwiches, or hummus and cucumber sandwiches.
5. Appetizer or Snack
Cut into slices and serve with hummus, white bean dip, olive tapenade, or a mixture of olive oil and herbs.
6. Rustic Bread Bruschetta
Toast slices lightly and top with chopped tomatoes, basil, garlic, and olive oil.
Recipe Variations
1. Whole-Wheat Artisan Bread
Replace 1–1½ cups of the all-purpose flour with whole-wheat flour. Add water gradually as needed. The loaf will have a heartier flavor and a denser texture.
2. Garlic and Herb Bread
Add 1 teaspoon garlic powder and 1–2 teaspoons dried rosemary or thyme to the dry ingredients. This version pairs well with soups and roasted vegetables.
3. Seeded Artisan Bread
Mix in 2–3 tablespoons of pumpkin seeds, sunflower seeds, sesame seeds, or ground flaxseed. For whole seeds, a brief soak can help prevent them from drawing too much moisture from the dough.
4. Olive and Herb Bread
Fold in approximately ⅓ cup of chopped, well-drained olives and 1 teaspoon of dried herbs. Reduce additional salt slightly if the olives are particularly salty.
5. Cheddar and Herb Bread
Fold in ½ cup of shredded cheddar and a little dried thyme. This variation is not dairy-free and may require careful monitoring because cheese can affect browning.
6. Sourdough-Inspired Bread
For a naturally leavened version, use an active sourdough starter instead of commercial yeast and adjust the water and flour accordingly. Fermentation time will vary depending on the starter and room temperature.
7. Gluten-Free Bread
This recipe cannot be converted simply by substituting a single gluten-free flour. Use a tested gluten-free Dutch oven bread recipe formulated with appropriate starches, binders, and hydration.
Storage and Freezing Instructions
Room temperature: Store the completely cooled loaf in a paper bag or bread box for approximately 2–3 days. The crust may gradually soften.
Refrigeration: Refrigeration is generally unnecessary and can make bread stale more quickly.
Freezing: Slice the cooled loaf, place the slices in a freezer-safe bag, and freeze for up to approximately 3 months for best quality.
Reheating: Toast individual slices directly from frozen. To refresh a larger piece, warm it in a preheated 350°F (175°C) oven until heated through and the crust becomes crisp.
Discard bread if you notice mold or unusual spoilage.
Estimated Nutrition Facts
The following values are estimates for the basic recipe made with all-purpose flour, divided into 10 servings. Actual values vary with the flour brand, loaf size, and portion weight.
- Calories: 145–155 per serving
- Carbohydrates: 30–32 g
- Protein: 4–5 g
- Total fat: Less than 1 g
- Saturated fat: Less than 0.2 g
- Dietary fiber: Approximately 1 g
- Sugars: Less than 1 g
- Sodium: Approximately 340–380 mg
These estimates do not include optional olive oil, seeds, cheese, or other additions. Sodium levels depend especially on the salt used and the final number of servings.
Whole-wheat flour and seeds can increase the fiber and healthy fat content. For precise nutritional information, calculate the recipe using the exact ingredients and weights you use.
Frequently Asked Questions
1. Why Is My Dutch Oven Bread Not Crusty?
The Dutch oven may not have been sufficiently preheated, or the loaf may not have baked long enough uncovered. Bake until the crust is deeply golden and allow the loaf to cool on a rack.
2. Can I Make Artisan Bread Without Kneading?
Yes. This recipe relies on a long resting period that allows gluten to develop naturally. Minimal handling is needed.
3. Can I Use All-Purpose Flour Instead of Bread Flour?
Yes. All-purpose flour works well, although bread flour may produce a slightly chewier texture because of its higher protein content.
4. Can I Make This Bread Without a Dutch Oven?
Yes. A heavy oven-safe pot with a lid can work if it is rated for the baking temperature. Alternatively, bake on a preheated baking stone or heavy baking sheet and use a suitable method to introduce steam. Never pour water into a hot glass dish or onto an oven element.
5. Why Is My Bread Dense?
Possible reasons include insufficient fermentation, inactive yeast, too much flour, or overly aggressive shaping. Allow the dough to become bubbly and expanded before shaping.
6. Can I Prepare the Dough Overnight?
Yes. Overnight fermentation is one of the main advantages of this recipe. The exact time depends on room temperature and yeast activity. If the dough rises too quickly in a warm room, move it to a cooler place or refrigerate it.
7. Is Dutch Oven Artisan Bread Vegan?
The basic recipe is vegan because it contains no eggs, milk, butter, or other animal-derived ingredients. Check any optional additions before serving.
8. Is Artisan Bread Good for Weight Management?
It can fit into a balanced diet, but portion size and overall dietary intake matter. Pairing a slice with protein-rich foods, vegetables, and healthy fats can help create a more satisfying meal.
9. Is This Bread Suitable for People With Diabetes?
Bread contains carbohydrates and can raise blood glucose. Individual responses vary, so portion size, flour choice, and the foods eaten alongside it are important. Whole-grain versions may provide more fiber, but they still contain carbohydrates.
10. Can I Use This Recipe for Meal Prep?
Yes. Bake a loaf ahead of time, allow it to cool completely, slice it, and freeze portions. This makes it convenient for quick breakfasts, sandwiches, and soup accompaniments.
Final Thoughts
Dutch Oven Crusty Artisan Bread is a simple and rewarding way to enjoy bakery-style bread at home. Its crisp golden crust, soft interior, and straightforward ingredient list make it an excellent choice for beginners and experienced home bakers alike.