Introduction
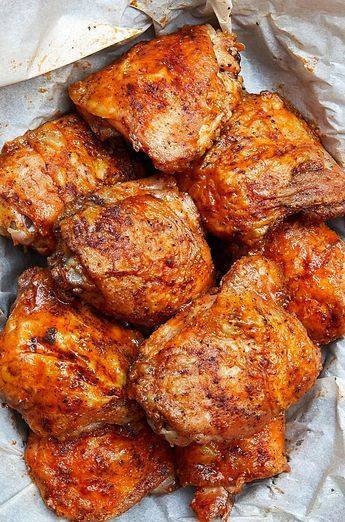
Chicken thighs are a favorite for many due to their rich flavor and tenderness. While deep-frying is the traditional method for achieving that irresistible crisp, oven-frying offers a healthier alternative that delivers similarly crunchy results without the need for excessive oil. This Crispy Oven-Fried Chicken Thighs recipe combines a savory marinade, a well-seasoned breading, and precise oven techniques to produce chicken that’s perfectly crispy on the outside and moist on the inside.
This recipe is designed for home cooks of all levels. We’ll guide you through the process of selecting quality chicken, marinating to maximize flavor, and applying a crisp coating that bakes to perfection. Additionally, you’ll find useful tips, variations to suit different taste preferences, and answers to frequently asked questions. Whether you’re preparing a family dinner or an impressive meal for guests, this recipe is sure to become a staple in your cooking repertoire.
Ingredients
For the Chicken Thighs:
- 6-8 bone-in, skin-on chicken thighs (about 2-3 pounds total)
(Bone-in, skin-on thighs yield a juicier result with extra flavor from the skin.)
For the Marinade:
- 1/4 cup buttermilk (or whole milk with 1 teaspoon lemon juice as a substitute)
- 2 tablespoons olive oil
- 4 cloves garlic, minced
- 1 teaspoon paprika (smoked paprika for extra depth is great)
- 1/2 teaspoon ground cumin
- 1/2 teaspoon dried thyme
- 1/2 teaspoon salt
- 1/4 teaspoon black pepper
- Juice of 1/2 lemon
For the Breaded Coating:
- 1 cup all-purpose flour
- 1/2 cup cornstarch
(Cornstarch helps to create an extra-crispy exterior.) - 1 teaspoon baking powder
- 1 teaspoon salt
- 1/2 teaspoon black pepper
- 1/2 teaspoon garlic powder
- 1/2 teaspoon onion powder
- 1/2 teaspoon smoked paprika
- 1/4 teaspoon cayenne pepper (optional, for heat)
For the Egg Wash:
- 2 large eggs
- 2 tablespoons water
Optional Extras:
- Fresh herbs (such as chopped parsley or chives) for garnish
- Lemon wedges for serving
- Hot sauce (for a spicy kick)
Equipment Needed
- Large mixing bowls
- Shallow dish for the breading mixture
- Whisk and fork (for the egg wash)
- Paper towels (for patting the chicken dry)
- Wire rack (optional, for cooling the chicken after baking)
- Baking sheet
- Cooling rack
- Oven with an accurate temperature setting
- Tongs or a spatula for handling the chicken
Instructions
Step 1: Marinating the Chicken Thighs
-
Prepare the Chicken:
- Rinse the chicken thighs and pat them dry thoroughly with paper towels. Removing excess moisture is crucial for achieving a crispy skin during baking.
- With bone-in, skin-on thighs, ensure the skin is intact; it will crisp up beautifully in the oven.
-
Mix the Marinade:
- In a large bowl, combine 1/4 cup buttermilk, 2 tablespoons olive oil, minced garlic, paprika, ground cumin, dried thyme, salt, black pepper, and lemon juice.
- Whisk the marinade until well blended.
-
Marinate the Chicken:
- Add the chicken thighs to the bowl, ensuring each piece is well-coated with the marinade.
- Cover the bowl with plastic wrap or transfer the chicken and marinade to a resealable plastic bag.
- Refrigerate for at least 2 hours, ideally overnight. The acidity in the buttermilk and lemon helps tenderize the meat and infuse it with flavor.
Step 2: Preparing the Breading Mixture
-
Combine Dry Ingredients:
- In a shallow dish, whisk together 1 cup all-purpose flour, 1/2 cup cornstarch, 1 teaspoon baking powder, 1 teaspoon salt, 1/2 teaspoon black pepper, 1/2 teaspoon garlic powder, 1/2 teaspoon onion powder, 1/2 teaspoon smoked paprika, and 1/4 teaspoon cayenne pepper (if using). This dry mixture forms the crispy coating that will encase your chicken.
-
Prepare the Egg Wash:
- In another shallow bowl, beat 2 large eggs with 2 tablespoons water. This egg wash will help the breading adhere to the chicken.
Step 3: Breading the Chicken
-
Remove and Pat Dry:
- After marinating, remove the chicken thighs from the marinade and let any excess drip off. Pat the thighs dry with paper towels to remove surface moisture. Dry skin ensures better adhesion of the breading and a crisper result.
-
Dredge in the Egg Wash:
- Dip each chicken thigh into the egg wash, ensuring that the surface is completely covered.
-
Coat with Breading:
- Transfer the chicken from the egg wash to the dry breading mixture. Use your hands or tongs to press the mixture onto the chicken. Make sure every part of the thigh, especially around the edges, is well coated. For extra crunch, you can double-dip: after the first coating, dip again in the egg wash and coat a second time in the dry mixture.
-
Rest the Breaded Chicken:
- Place the breaded chicken thighs on a plate and let them rest for 10 minutes at room temperature. This rest period helps the breading adhere firmly to the meat before baking.
Step 4: Preheating and Setting Up the Oven
- Preheat the Oven:
- Preheat your oven to 425°F (220°C). A higher temperature is essential for achieving a golden, crispy crust on the chicken thighs.
- Prepare the Baking Sheet:
- Line a large baking sheet with parchment paper or a silicone baking mat. This helps prevent sticking and makes cleanup easier.
- Optionally, place a wire rack on the baking sheet. Elevating the chicken allows hot air to circulate around the meat, which improves crisping on all sides.
Step 5: Baking the Chicken Thighs
-
Arrange the Chicken:
- Place the breaded chicken thighs on the prepared baking sheet or wire rack in a single layer. Ensure there is sufficient space between each piece so that the hot air can circulate freely.
-
Initial Baking Phase:
- Bake in the preheated oven for 25-30 minutes. During this time, the breading will turn golden and the chicken will cook through. If you’re using a wire rack, the fat will drip away, further enhancing the crispiness.
- Use a meat thermometer to check that the internal temperature of the chicken reaches at least 165°F (74°C) for safe consumption. However, for optimal juiciness, aim for 170°F (77°C) in thicker parts.
-
Optional Broiling:
- If the chicken thighs have reached the correct internal temperature but you desire an extra-crispy exterior, switch your oven to broil for the last 3-5 minutes. Watch closely to ensure the breading does not burn.
-
Turn the Chicken (Optional):
- For even crisping, you may flip the chicken halfway through the baking process. If you choose to do this, handle the chicken gently to avoid disturbing the breading.
Step 6: Resting and Serving
-
Rest the Chicken:
- Once baked, remove the chicken thighs from the oven and transfer them to a cooling rack. Allow them to rest for at least 5-10 minutes before serving. Resting allows the juices to redistribute, ensuring each bite is moist and flavorful.
-
Garnish and Plate:
- Garnish the chicken with freshly chopped herbs such as parsley or chives. A squeeze of lemon over the top can add a bright contrast to the savory flavors.
- Arrange the chicken thighs on a serving platter. Serve alongside your favorite sides—roasted vegetables, mashed potatoes, a fresh salad, or even a dipping sauce like spicy mayo or honey mustard.
-
Serving Suggestions:
- For a complete meal, pair these crispy chicken thighs with steamed rice, coleslaw, or a hearty grain salad.
- They also make a great appetizer—serve bite-sized pieces on cocktail sticks with a small bowl of dipping sauce.
Tips for Perfect Crispy Oven-Fried Chicken Thighs
-
Quality of Chicken:
Choose bone-in, skin-on chicken thighs for the best flavor and juiciness. The bone and skin add extra moisture and flavor during cooking. -
Marination:
Marinating the chicken in buttermilk and spices not only infuses flavor but also helps tenderize the meat. The acidity in the marinade is key to a tender bite. -
Drying the Chicken:
Pat the chicken dry after marination. Excess moisture can hinder the crisping process, so make sure the surface is as dry as possible before breading. -
Breading Technique:
A good breading mixture is crucial. The combination of flour and cornstarch provides both structure and crispiness. Don’t rush the double-dip process if you desire an extra thick crust. -
Preheating:
Always preheat your oven to ensure the chicken starts cooking at the correct temperature. Using a wire rack helps the air circulate around the chicken, leading to a uniformly crispy finish. -
Monitoring Doneness:
Use a meat thermometer to ensure your chicken reaches the safe internal temperature without overcooking, which can dry out the meat. -
Resting:
Allowing the chicken to rest after baking is essential. It helps the juices settle within the meat, making the final product moist and flavorful.
Variations and Creative Ideas
Variation 1: Spicy Oven-Fried Chicken Thighs
- Extra Heat:
Add more cayenne pepper or a dash of hot sauce to the marinade and breading mixture for a spicier version. - Spicy Glaze:
Brush the chicken with a glaze made from melted butter mixed with a little sriracha during the last 5 minutes of cooking.
Variation 2: Herb-Infused Chicken
- Herb Butter:
Mix extra fresh herbs (such as rosemary, thyme, or basil) into softened butter and baste the chicken during the last few minutes of baking. - Herbed Marinade:
Increase the quantity of fresh herbs in the marinade for a more aromatic dish.
Variation 3: Sweet and Savory Twist
- Honey Mustard Glaze:
Create a glaze using honey, Dijon mustard, and a bit of apple cider vinegar. Brush this glaze over the chicken in the final minutes of baking for a sweet and tangy finish. - Caramelized Onions:
Serve the chicken with a side of caramelized onions for an extra layer of sweetness that complements the savory flavors.
Variation 4: Asian-Inspired Chicken Thighs
- Soy and Ginger Marinade:
Replace part of the marinade with soy sauce, a splash of rice vinegar, and freshly grated ginger. Top with sesame seeds and chopped green onions before serving. - Sweet Chili Sauce:
Serve with a side of sweet chili sauce for dipping, adding an extra dimension of flavor.
Variation 5: Crunchy Coating Enhancement
- Panko Addition:
For an even crunchier coating, mix 1/2 cup panko breadcrumbs into the dry breading mixture. Panko provides an airy, crispy texture that contrasts well with the tender meat. - Double Dipping:
For extra thickness, dip the chicken twice in the egg wash and coating mixture. This creates a robust, crunchy exterior that stays intact even after baking.
Frequently Asked Questions (FAQs)
Can I Use Boneless Chicken Thighs?
Yes, boneless chicken thighs can be used; however, bone-in, skin-on thighs generally yield a juicier and more flavorful result. If using boneless thighs, reduce the cooking time slightly as they tend to cook faster.
How Long Should I Marinate the Chicken?
For optimal flavor and tenderness, marinate the chicken for at least 2 hours. For best results, marinate overnight in the refrigerator. Just be sure to allow the chicken to come to room temperature before cooking.
What Temperature Should I Bake the Chicken At?
Baking at 425°F (220°C) is ideal for achieving a crispy exterior while ensuring the chicken cooks through. If your oven runs hot, you might need to adjust the temperature slightly.
How Do I Prevent the Breaded Coating from Falling Off?
Pat the chicken dry after marinating, and make sure it’s well-coated with the egg wash and dry mixture. Allowing the coated chicken to rest for 10 minutes before baking helps the breading adhere better.
Can I Reheat the Chicken Thighs?
Yes, leftovers can be stored in an airtight container in the refrigerator for up to 3 days. Reheat in an oven preheated to 350°F (175°C) for about 10 minutes or use an air fryer for 5-7 minutes to restore crispiness.
What Side Dishes Pair Well With This Recipe?
These crispy oven-fried chicken thighs pair well with mashed potatoes, roasted vegetables, a fresh salad, rice, or even coleslaw. They make a complete meal when served with your favorite sides.
Conclusion
This Crispy Oven-Fried Chicken Thighs recipe is a testament to the idea that you don’t need to deep-fry to achieve crispy, flavorful chicken. By carefully marinating, breading, and baking the chicken, you can create a dish with a golden, crunchy exterior and a juicy, tender interior that rivals any restaurant offering.
Every step in this guide—from selecting high-quality chicken and creating a balanced marinade to perfecting the breading and baking process—has been designed to ensure a consistently delicious outcome. With detailed instructions, tips, and variations, you have the flexibility to tailor the recipe to your taste preferences, whether you prefer it spicy, herb-infused, or with a sweet twist.
We hope this comprehensive guide helps you master the art of making crispy oven-fried chicken thighs at home. Enjoy the process, experiment with different flavors, and savor every bite of your homemade creation. Happy cooking, and may your kitchen be filled with the irresistible aroma of perfectly baked, crispy chicken!