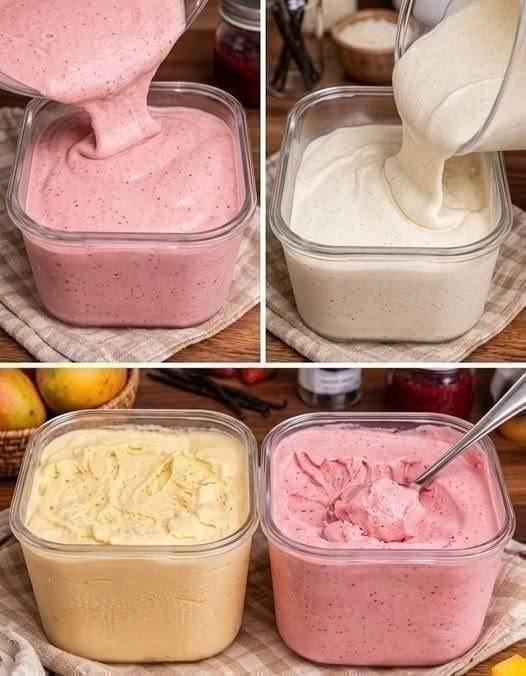
There’s something truly comforting about homemade ice cream. It might be the little tastes everyone sneaks while you’re preparing it, the smiles around the table, or that wonderful feeling of opening the freezer and finding a creamy, homemade treat waiting for you. Whatever the reason, making ice cream at home has a way of turning an ordinary day into a special memory.
This Homemade 2-Flavor No-Churn Ice Cream is a simple treat that brings together two all-time favorites: sweet, fruity strawberry and smooth, creamy vanilla. The best part? You don’t need an expensive ice cream maker or any complicated techniques. Just a few simple ingredients, a little preparation, and some patience while it freezes. Before you know it, you’ll have two delicious flavors ready to scoop, share, and enjoy with the people you love.
Homemade 2-Flavor No-Churn Ice Cream (Strawberry & Vanilla)
Recipe Description
Enjoy two delicious flavors of homemade no-churn ice cream with this easy strawberry and vanilla ice cream recipe. Made without an ice cream machine, these creamy frozen desserts are perfect for summer, family gatherings, and satisfying sweet cravings at home.
The strawberry version offers a fruity, refreshing taste, while the vanilla version delivers a smooth, rich, classic flavor. With a simple combination of whipped cream and sweetened condensed milk, you can prepare both flavors using basic kitchen equipment.
This recipe can also be adapted to suit different dietary preferences, including reduced-sugar options and dairy-free alternatives. Although homemade ice cream is not a proven anti-inflammatory treatment, you can make ingredient choices that support an overall balanced, anti-inflammatory eating pattern.
Recipe Details
-
Preparation time: 20 minutes
-
Freezing time: 6–8 hours, preferably overnight
-
Total time: Approximately 6–8 hours 20 minutes
-
Servings: 8–10 servings per batch, depending on portion size
-
Difficulty: Easy
-
Cuisine: International
-
Category: Frozen dessert
-
Method: No-churn, no ice cream machine required
Ingredients
For the Vanilla Ice Cream
-
2 cups (480 ml) cold heavy whipping cream
-
1 can (approximately 397 g) sweetened condensed milk
-
2 teaspoons pure vanilla extract
-
1 pinch of salt (optional)
For the Strawberry Ice Cream
-
2 cups (480 ml) cold heavy whipping cream
-
1 can (approximately 397 g) sweetened condensed milk
-
1 cup (150 g) fresh or frozen strawberries
-
1 teaspoon vanilla extract (optional)
-
1 teaspoon lemon juice (optional)
Note: These ingredients make two separate batches. If you want a smaller quantity of each flavor, prepare half of each ingredient list.
Instructions
Step 1: Prepare the Strawberries
Wash and hull the fresh strawberries. Blend them into a smooth puree. For a thicker ice cream with less excess water, simmer the puree in a small saucepan for 5–10 minutes until reduced, then cool completely before using.
If using frozen strawberries, thaw them first and drain excess liquid.
Step 2: Whip the Cream
Pour the cold heavy whipping cream into a large mixing bowl. Using an electric mixer, beat until stiff peaks form. The cream should be fluffy and hold its shape without becoming grainy or buttery.
Step 3: Prepare the Vanilla Base
In a separate bowl, combine the sweetened condensed milk, vanilla extract, and a pinch of salt.
Gently fold the whipped cream into the condensed milk mixture in two or three additions. Use a spatula and avoid overmixing to preserve the airy texture.
Step 4: Prepare the Strawberry Base
In another bowl, combine the sweetened condensed milk with the cooled strawberry puree and optional lemon juice.
Fold in the whipped cream gently until the mixture is smooth and evenly colored.
Step 5: Transfer to Containers
Pour the vanilla mixture into a clean, freezer-safe container. Transfer the strawberry mixture into a second container.
Smooth the surfaces with a spatula. Cover both containers tightly with lids to prevent ice crystals and unwanted freezer odors.
Step 6: Freeze Until Firm
Freeze for 6–8 hours or overnight until the ice cream is firm enough to scoop.
Allow the containers to sit at room temperature for approximately 5 minutes before serving if the ice cream is too hard.
Serving Suggestions
-
Fresh fruit bowl: Serve a scoop of strawberry and a scoop of vanilla ice cream with fresh strawberries, blueberries, or sliced bananas.
-
Healthy dessert pairing: Enjoy a small portion after a balanced meal containing vegetables, whole grains, and protein.
-
Ice cream sundae: Add chopped nuts, fresh berries, and a small drizzle of melted dark chocolate.
-
Summer party dessert: Serve both flavors in chilled bowls or waffle cones for birthdays, barbecues, and family celebrations.
-
Homemade milkshake: Blend one or two scoops with milk for a creamy strawberry or vanilla milkshake.
-
Fruit parfait: Layer small scoops with fresh berries and chopped nuts for a special-occasion dessert.
For a more nutrient-conscious option, keep portions moderate and use fresh fruit or unsweetened nut toppings rather than large amounts of sugary sauces.
Recipe Variations
1. Anti-Inflammatory Strawberry Ice Cream
For a fruit-forward version, use a higher proportion of strawberries and add a small amount of finely grated fresh ginger. You can also serve the ice cream with blueberries or walnuts.
Strawberries contain vitamin C and polyphenols, which are beneficial components of a balanced diet. However, the dessert itself should not be considered an anti-inflammatory treatment.
2. Reduced-Sugar Ice Cream
Use an appropriate lower-sugar condensed milk alternative or a recipe specifically formulated with a suitable sweetener. Keep in mind that sugar contributes to the texture of frozen desserts, so substitutions may change the consistency.
3. Greek Yogurt Strawberry Ice Cream
Replace part of the condensed milk with thick Greek yogurt and adjust the sweetener to taste. This creates a tangier dessert and may increase protein, depending on the ingredients used.
The texture may be less creamy than the original recipe.
4. Dairy-Free Vanilla Ice Cream
Use chilled coconut whipping cream and a suitable dairy-free condensed milk alternative. Whip according to the product instructions, then add vanilla and freeze.
Coconut-based versions may contain substantial saturated fat, so check the nutrition labels if that is a dietary consideration.
5. Strawberry Chocolate Chip Ice Cream
Fold 2–3 tablespoons of mini dark chocolate chips into the strawberry mixture just before freezing.
6. Vanilla Cinnamon Ice Cream
Add ½ teaspoon ground cinnamon to the vanilla base for a warm, aromatic flavor. Cinnamon adds flavor but does not make the dessert a medical treatment for inflammation.
7. Berry Ice Cream
Replace some or all of the strawberries with raspberries, blackberries, or blueberries. Cook and cool watery fruit purees before adding them to help prevent an icy texture.
Nutrition Information
The following estimates are for the original recipe made with heavy whipping cream and sweetened condensed milk. Actual values vary by brand, ingredient proportions, and serving size.
|
Nutrient |
Vanilla, per serving |
Strawberry, per serving |
|---|---|---|
|
Calories |
280–350 kcal |
280–360 kcal |
|
Protein |
4–6 g |
4–6 g |
|
Total carbohydrates |
25–35 g |
28–38 g |
|
Total sugars |
23–33 g |
24–34 g |
|
Total fat |
18–25 g |
18–25 g |
|
Saturated fat |
11–16 g |
11–16 g |
|
Fiber |
0 g |
0.5–1.5 g |
Estimates assume approximately 8 servings per flavor batch. These are not laboratory-tested values; calculate nutrition using the specific products you use for a more accurate result.
Is This Ice Cream Anti-Inflammatory?
Not inherently. The standard recipe contains added sugar and saturated fat, so it is best enjoyed occasionally and in moderate portions.
To make the dessert more compatible with an anti-inflammatory dietary pattern:
-
Use strawberries and other colorful fruits for naturally occurring antioxidants.
-
Consider reducing added sugar where practical.
-
Serve with walnuts, almonds, or fresh berries.
-
Focus on an overall eating pattern rich in vegetables, fruits, legumes, whole grains, nuts, seeds, and healthy fats.
-
If you have diabetes or another condition requiring dietary management, consider the carbohydrate content and your individual nutritional needs.
No single food can reliably prevent or treat chronic inflammation.
Frequently Asked Questions
1. Can I make no-churn ice cream without an ice cream machine?
Yes. Whipped cream provides air, while sweetened condensed milk contributes sweetness and a smooth texture. Together, they create a creamy frozen dessert without requiring an ice cream maker.
2. Why is my homemade ice cream too hard?
Homemade ice cream can become very firm because of the freezer temperature and the balance of sugar, fat, and water. Let it soften at room temperature for a few minutes before scooping.
3. How do I prevent ice crystals?
Use a thick fruit puree, cool cooked fruit completely, and store the ice cream in an airtight, freezer-safe container. Avoid repeatedly thawing and refreezing it.
4. Can I use frozen strawberries?
Yes. Thaw and drain them, then blend into a puree. Reducing the puree in a saucepan can help remove excess moisture.
5. Is homemade ice cream healthier than store-bought ice cream?
Not necessarily. Homemade ice cream gives you control over ingredients, but cream and condensed milk can still contribute considerable sugar, calories, and saturated fat. Compare nutrition labels and ingredient quantities rather than assuming homemade automatically means healthier.
6. Is this recipe suitable for people with diabetes?
The original version contains substantial carbohydrates and added sugar. People with diabetes should consider portion size, total carbohydrates, and their individual dietary plan. A lower-sugar alternative may be more appropriate.
7. Can I make this recipe without condensed milk?
Yes, but the recipe will need adjustment. Condensed milk provides sweetness and helps keep the ice cream soft. Alternatives such as a suitable sweetened yogurt base or a formulated sugar-free condensed milk substitute may change the final texture.
8. How long does homemade no-churn ice cream last?
For best flavor and texture, enjoy it within 1–2 weeks when continuously stored in a tightly sealed container at 0°F (-18°C) or below. Avoid leaving it at room temperature for extended periods.
Final Thoughts
Homemade 2-Flavor No-Churn Ice Cream is a simple way to enjoy creamy strawberry and classic vanilla desserts without specialized equipment. With a handful of ingredients and a little freezer time, you can prepare two flavors that work well for family desserts, summer parties, and homemade frozen treats.